
[Project] Pigeon Patrol: A Simulated Drone Sensor Data Generation System.
Published:
Project by Minh Duc Bui, Jannik Brinkmann, Lukas Degitz, Elina Tugaeva. As this project is now used in another project, the code unfortunately can not be released.
Table of Contents
1. Introduction
Pigeon patrol is a simulated sensor data generation system. It collects drone flight information using the AirSim simulator for Unreal Engine. Singular components (folders) of the project are built as Unreal Engine Plugins, that enable the different functionalities of the simulator. They provide:
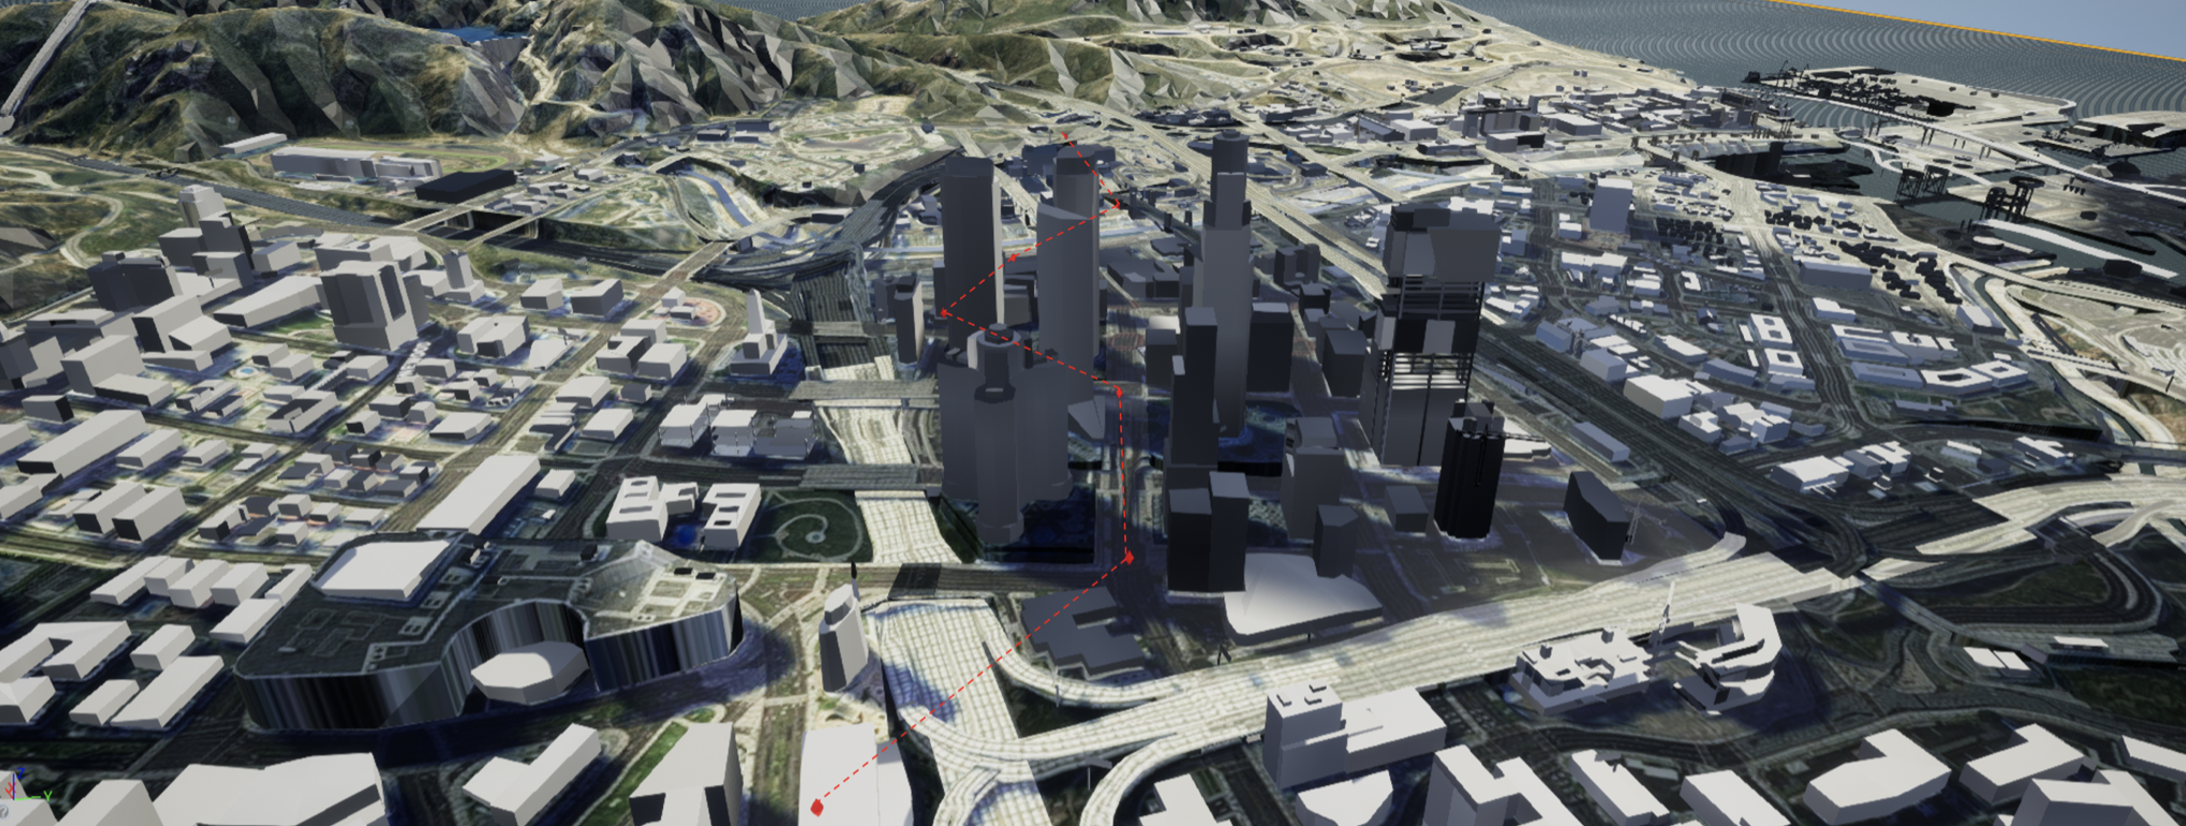
- The option to manually or automatically specify drone flightpaths through the environment,
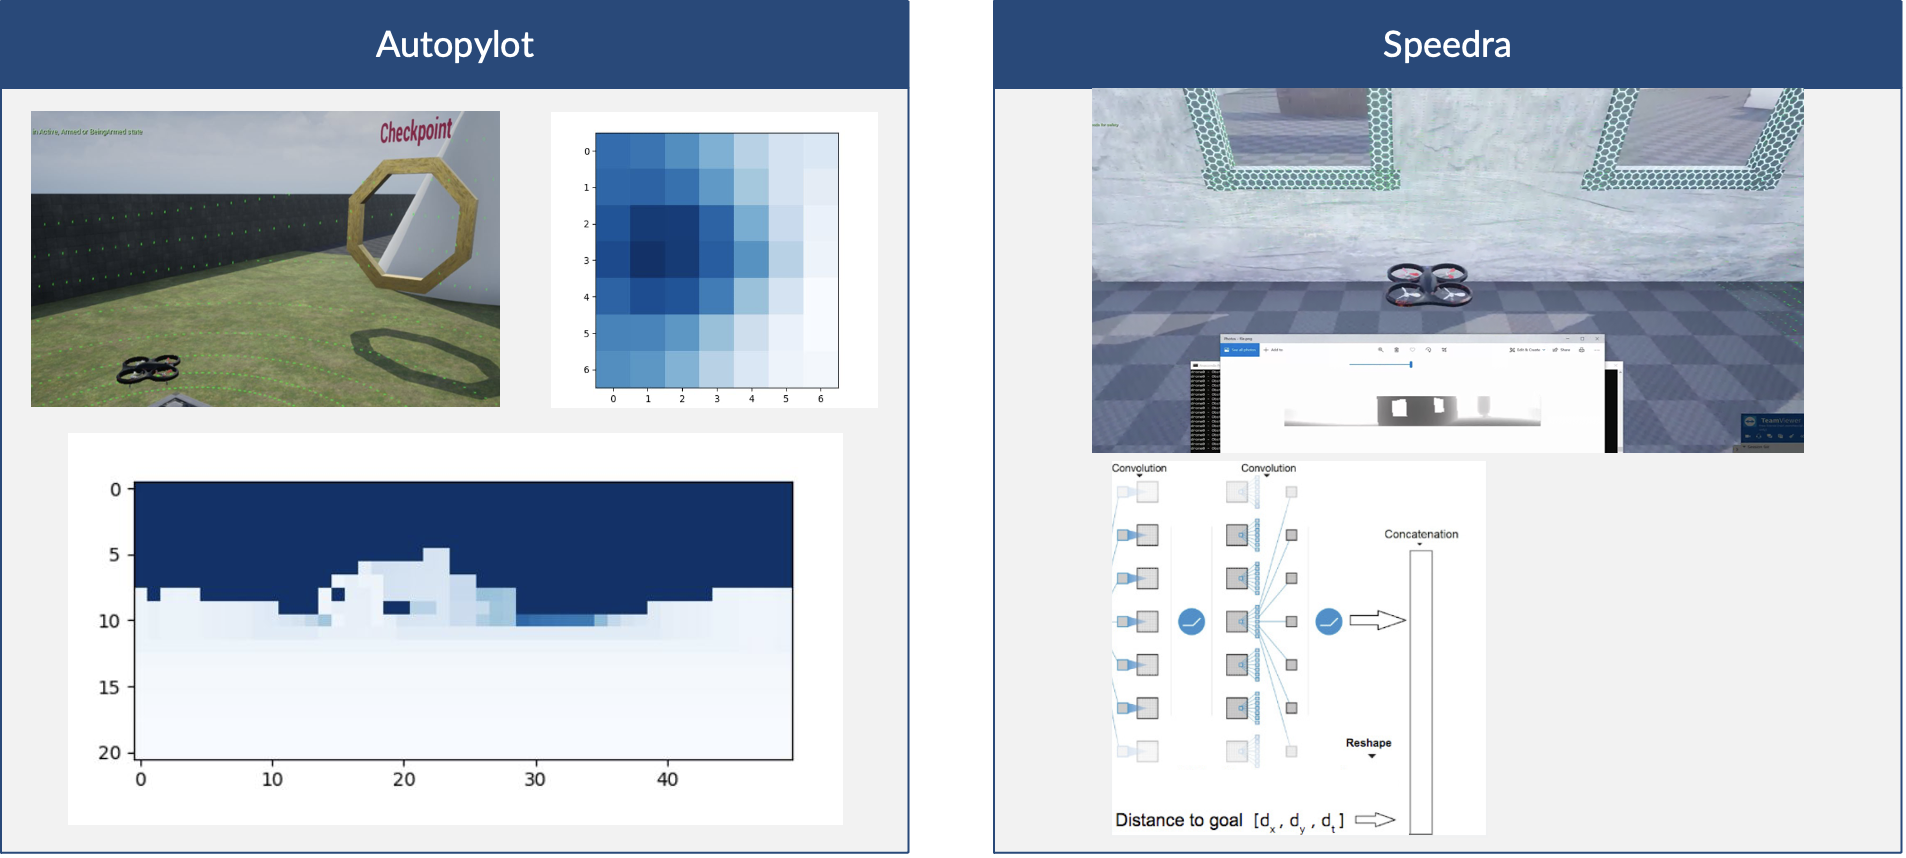
- The choice of two pre-trained reeinforcement learning piloting systems, called Autopylot and Speedra, to navigate the flightpaths
- And a selection of which sensor information is to be tracked during flight.
The simulator was developed for a large-scale unreal environment with varying landscape to allow for diverse data generation. The fan-made 3D model of the area of popular video game Grand Theft Auto V (GTA5) fullfills these requirements.
2 Software Architecture
The software architecture of our product consists of three major parts:
- Integration into Unreal Engine: This building block allows a seemingly effortless integration into the Unreal Engine. It provides a simple user experience by allowing complex functionality to be executed with just a button click.
- Functional backend: This building block encompasses all custom-developed functionality that directly interacts with the Unreal Engine editor, i.e. accesses the information of the environment or creates / destroys actors in the environment.
- Reinforcement learning backend: This building block enables the training of our drone pilots using reinforcement learning. Further, it is used to perform the drone movements in the inference mode.
In the following, these core components are considered separately in detail.

2.1 Unreal Engine Editor
2.1.1 Environment
The provided environment can be seen and interacted with in the Unreal Engine viewport.
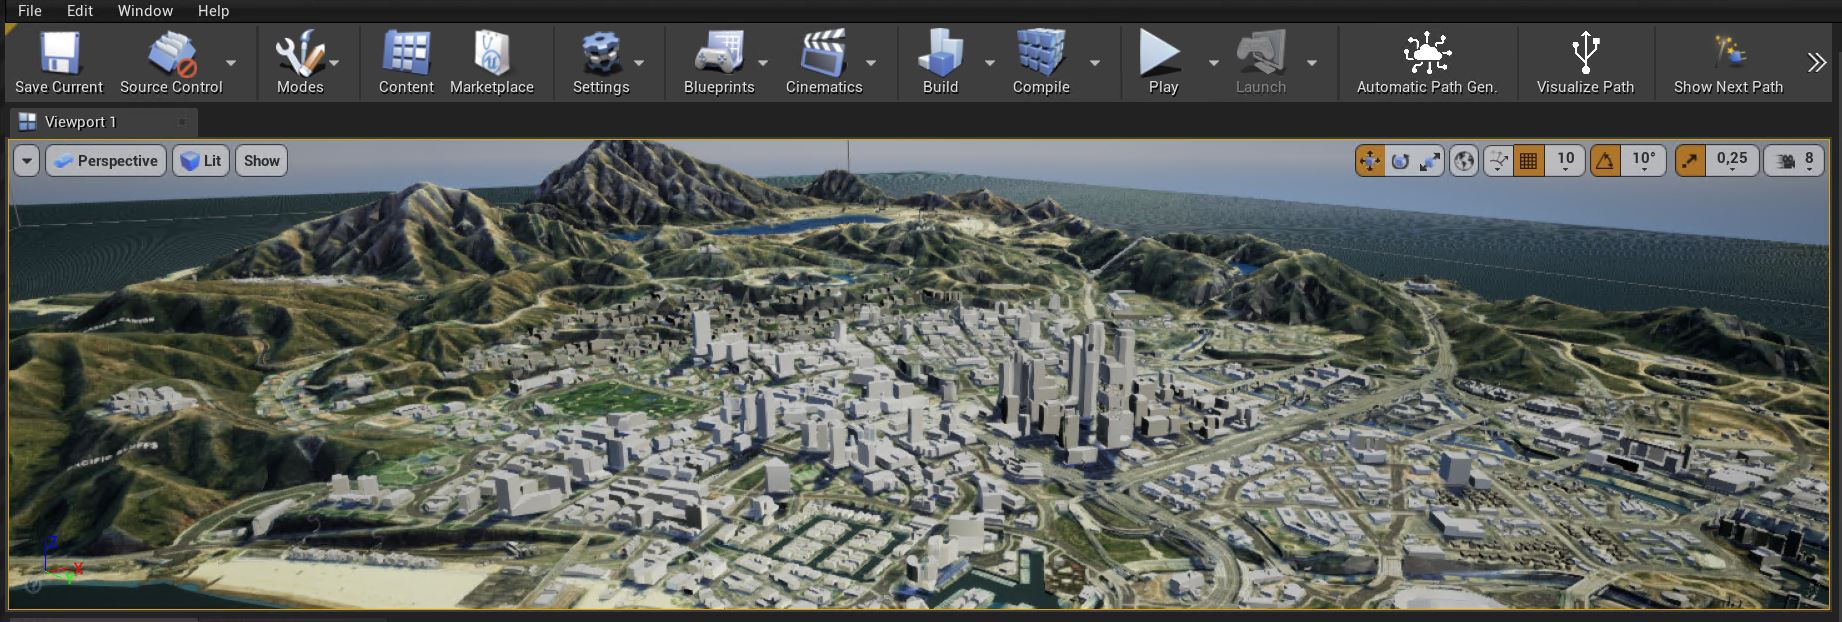
The environment contains multiple predefined components, that are required for the general layout and plugin functionality.
2.1.2 Plugins
The functionality surrounding the data generator is structured in Unreal Engine plugins. These plugins are collections of code and data that developers can easily enable or disable within the Editor on a per-project basis (https://docs.unrealengine.com/en-US/ProductionPipelines/Plugins/index.html). While plugins generally can have various purposes, e.g. create new file types or add runtime gameplay functionality, within our project each plugin extends the capabilities of the Unreal Editor with new tool bar commands.
The Unreal Engine editor is developed in C++, wherefore all native plugins must be developed in C++ as well. In order to maintain a uniform programming language across most of our product, we exploit the available Python Editor Script Plugin. This plugin introduces a custom virtual environment to the Unreal Engine editor that allows us to call functionality implemented in C++ using Python functions. Therefore, in our product, the native plugins serve the only purpose to forward the function call from the Unreal Engine plugin (implemented in C++) to the custom developed scripts (implemented in Python, exploiting the Unreal-API). This forward pass of the call allows seemingly effortless integration into the Unreal Engine, because all functionality is available in the Unreal Editor with a simple button click.
While the actual functionality of the plugins is described in more detail in Section 2.2 Functional Backend, the following listing is intended to provide a brief overview in advance:
- PigeonPatrol_GenerateData: This plugin starts the selected drone pilot; depending on the respective configurations, it will either start training the drone pilot using reinforcement learning or it will make the drone fly the selected flight paths and write sensor data to a local file.
- PigeonPatrol_AutomaticPathGeneration: This plugin allows the user to automatically generate large amounts of diverse flight paths that all abide to certain characteristics that have previously been specified in the PigeonPatrol settings.
- PigeonPatrol_ManualPathSpecification: This plugin allows the user to manually specify flight paths by drag-and-dropping checkpoint elements into the environment and clicking the button afterwards. This enables the user to (re-)create specific flight paths the user is interested in.
- PigeonPatrol_VisualizePath: This plugin allows the user to visualize flight paths in the environment. Therefore, after selecting the .json-file containing the flight paths, this plugin will automatically generate the respective checkpoints in the environment. This enables the user to evaluate the flight paths, once they have been generated or specified. In case the selected file contains more than one flight path, only the first flight path is visualized.
- PigeonPatrol_VisualizeNextPath: This plugin works together with the PigeonPatrol_VisualizePath-plugin. In case the selected file contains more than one flight path and flight path k is currently visualized, clicking this button will trigger the visualization of flight path k + 1.
- PigeonPatrol_Settings: When clicking this button, the PigeonPatrol settings are opened using Notepad. Here the user can specify various parameters for the different plugins.
- PigeonPatrol_ConvertToMat: This is a supportive plugin that can be used to convert a .txt-file to a .mat-file. The plugin does not provide any further functionality that affects the generation of flight paths or the writing of sensor data. This plugin should only be used in case, for whatever reason, the simulation was terminated and the user is left with a plain .txt-file.
2.2 Functional Backend
The backend contains the functionality implemented in Python. These functions are called from the Unreal Editor plugins, when the respective button is clicked. In the following, the functionality related to each of the most relevant plugins is described in more detail.
2.2.1 PigeonPatrol_GenerateData
In the following, the plugin to generate data is described in more detail. This plugin has two purposes that are dependent on the config-files of the drone pilots:
- Train the Drone Pilot: If the selected drone pilot is setup in the mode ‘train’ in its config-file, triggering this plugin will start the training of the drone using the reinforcement learning backend.
- Generate Sensor Data: If the selected drone pilot is setup in the mode ‘infer’ in its config-file, triggering this plugin will start the drone pilot in inference mode. Therefore, the drone pilot will fly the defined checkpoints in the flight paths without any form of training taking place. While doing so, this plugin constantly writes the current sensor data to a local file.
2.2.2 PigeonPatrol_AutomaticPathGeneration
In this section, we describe the Plugin “Automatic Drone Path Generation” (ADPG). ADPG allows the user to automatically generate large amounts of diverse flight paths that all abide to certain characteristics that have previously been specified in the PigeonPatrol settings.
To use the ADPG, one just needs to click the plugin-icon “Automatic Path Gen.” in the plugin control bar:

To give a brief motivation on our algorithm, we define the goals of ADPG:
- To generate valid and diverse paths. Valid meaning that no checkpoint is inside an object, should be above the map and should somehow resemble real flight paths. Additionally, flightpaths should be different from each other.
- To have paths, where we can specify the start and end biome.
- To have paths consisting of an arbitrary number of Checkpoints and Paths.
2.2.3 PigeonPatrol_ManualPathSpecification
In the following, the manual drone path specification (MDPS) is described in more detail. The purpose of the MDPS is to enable the user to create a custom flight path on his own that may include scenarios that he is especially interested in, e.g. make the drone fly under a bridge. Therefore, we exploit the drag-and-drop functionality that is already part of the Unreal Engine editor, with which the user can select the blueprint from the content browser and place it in the environment. This plugin can only be used when the simulation is turned off.
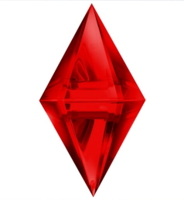
We introduce a new blueprint into the content browser, which can be used to specify a checkpoint. The checkpoint element looks similar to the element above. When placing these checkpoints in the environment, each of these checkpoints will have an invisible actor tag called ‘Checkpoint’. These actor tags are exploited to distinguish checkpoint elements from other elements in the environment.
In the following, the user workflow to generate custom flight paths is described:
- The user drags-and-drops checkpoint elements into the environment. These checkpoint elements mark checkpoints of the intended flight path.
- Once he is done specifying the flight path, the user clicks the button Manual Path Spec. in the Unreal Engine editor toolbar. This creates a flight path .json-file in the folder {environment_name}/Plugins/PigeonPatrol/Paths with the current time stamp as the name of the file.
2.2.4 AirSim Plugin
The AirSim plugin enables the drone flight simulation as a central functionality of this project. It has a detailed documentation of which the most significant parts for this project are explained in this section.
Conventional reinforcement learning systems like PEDRA often use pictures to represent information about the surrounding environment. Since both automatic drone pilots in this project rely on Lidar sensor information, they are explained in more detail.
Lidar Sensors Lidar sensors use infrared rays and travel times to estimate a reflection point in a certain direction. AirSim provides the option to visualize reflection points during simulation, which can help to understand how they work. Each Lidar point in the pointcloud, that is returned when calling the sensor, is visualized as a green dot. The horizontal and vertical field of view and spacing between dots, as well as the sensor range can be defined in the sensor settings.
| Indoor | Outdoor |
|---|---|
 | 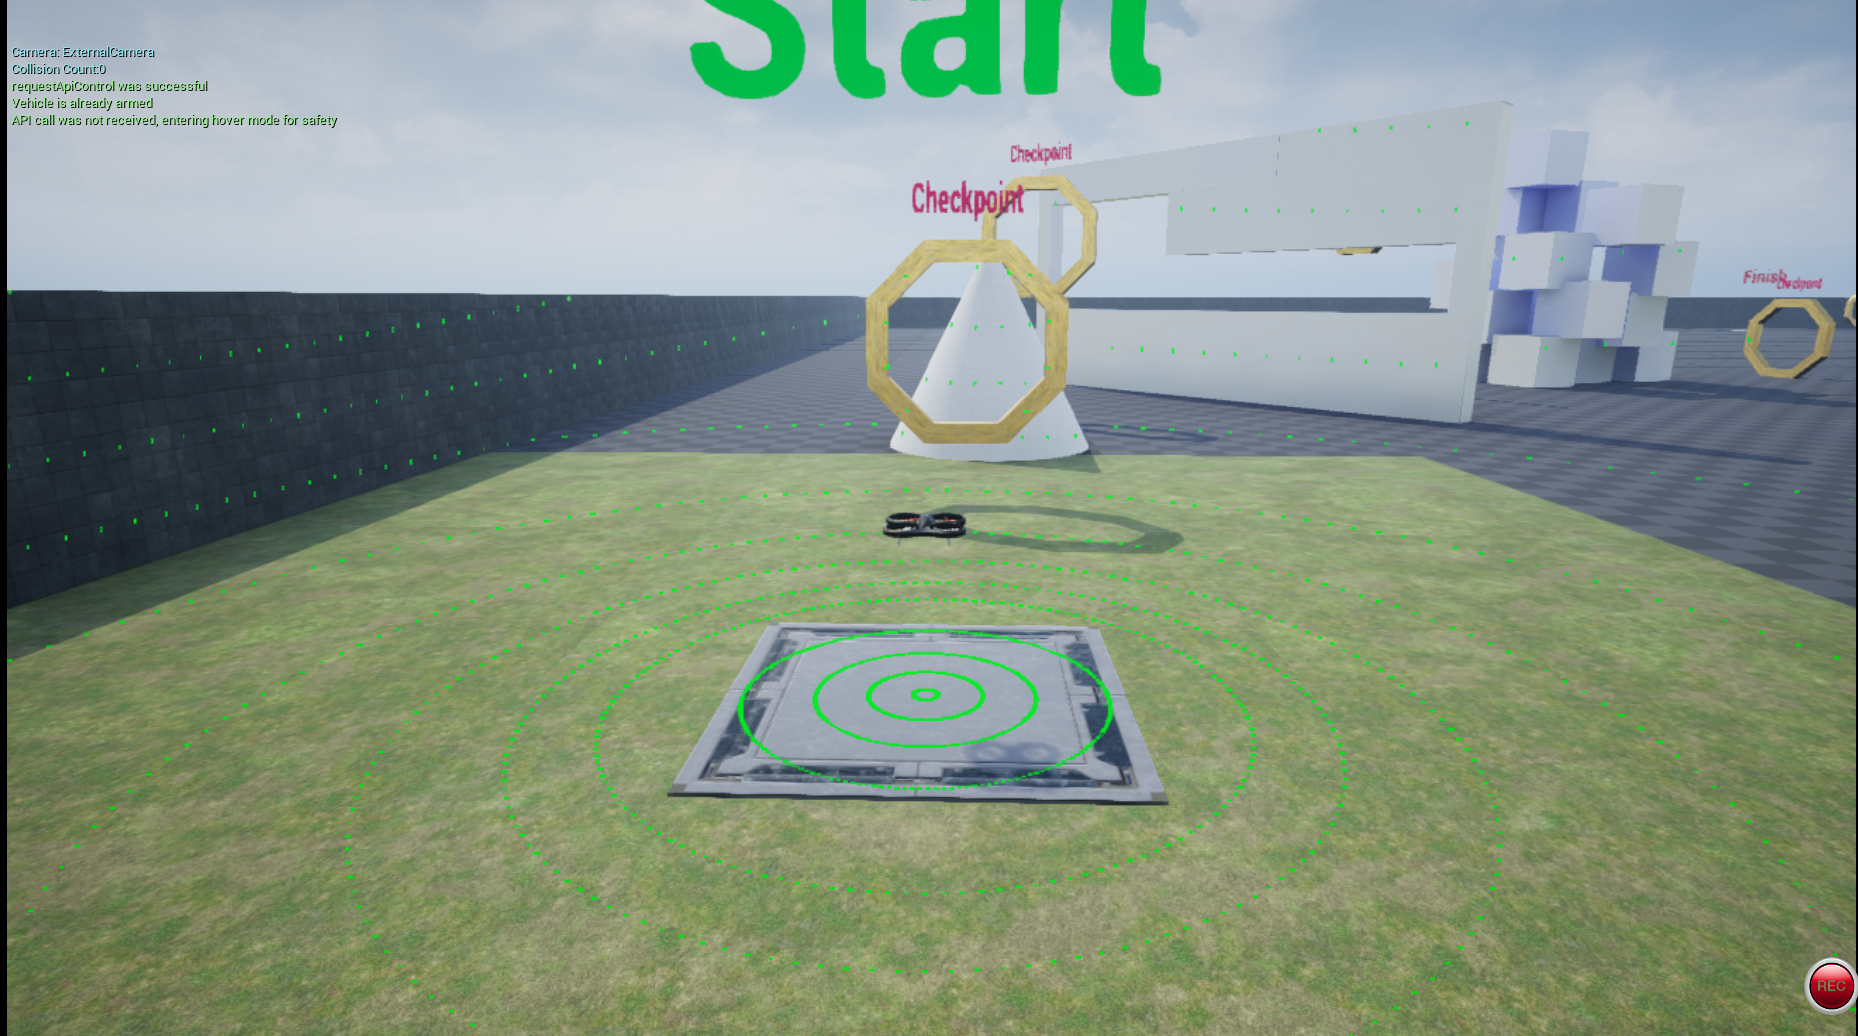 |
Difficulties with using Lidar sensors become obvious when the box around the drone is removed. Now, only points within the defined range are detected and returned (e.g. on the ground, on obstacles). For directions that are free of obstacles (e.g. above the drone) no points are returned, since sensor rays are not reflected. Thus, depending on the drone position and environment, a different amount of points is returned. E.g. in the top picture the maximum amount of points will be present in the point cloud. In the lower one however, only a part of the possible points are returned. This results in varying shape of sensor data output. Since neural networks usually require a fixed input shape, the sensor data has to be preprocessed appropriatly. Because preprocessing for the automatic pilots assumes specific Lidar sensor settings, they have to be static for the respective pilot.
AirSim Python API
To exchange information with the simulated drone, AirSim provides multiple different APIs of which the python api is used in this project. Since the documentation of this API is thin, the following section is used to explain most of the used functionality from this API.
The api is built around the central airsim package. Once imported it provides datastructures and core functions:
| Type | Name | Description | Params | Returns |
|---|---|---|---|---|
| Function | MultirotorClient() | Initialize a drone client, tries to connect to the drone in the environment (play mode required!) | (str) ip_address, vehicle_name | MultirotorClient object |
| Function | to_eularian_angles() | Converts quaternion to euler angles | airsim.quaternion object | (float)[pitch, roll, yaw] |
| Function | to_quaternion() | Converts euler angles into quaternion object | (float) pitch, roll, yaw | Quaternion object |
| Type | Vector3r | represents a 3D vector e.g. for positions in 3D | (float) x_val, y_val, z_val | Vector3r object |
| Type | Pose | represents position and rotation (pose) in the environment | (Vector3R) position, (Quaternion) rotation | Pose object |
These lists are by no means complete, but contains the most important functionalities to understand the core workings of Autopylot and Speedra.
3 Piloting Systems

3.1 Introduction to RL: Deep Q-learning
In this section, we will provide a short introduction to Reinforcement Learning (RL) with a special focus on Deep Q-Learning methods, since both autopilots use this method. We will identify the most important parts of this approach and provide a clear distinguishment between the two piloting systems.
3.1.1 Reinforcement Learning Formalism
We will look at important terms in Reinforcement learning:
- Environment: The Environment is external to an agent, and its communication with the environment is limited by rewards, actions and observations
- Agent: The Agent is something which interacts with the environment by executing certain actions
- Actions: Actions are things that an agent can do in the environment (discrete or continuous)
- Reward Function: The purpose of reward is to tell our agent how well they have behaved
- States: The agent arrives at different scenarios known as states by performing actions
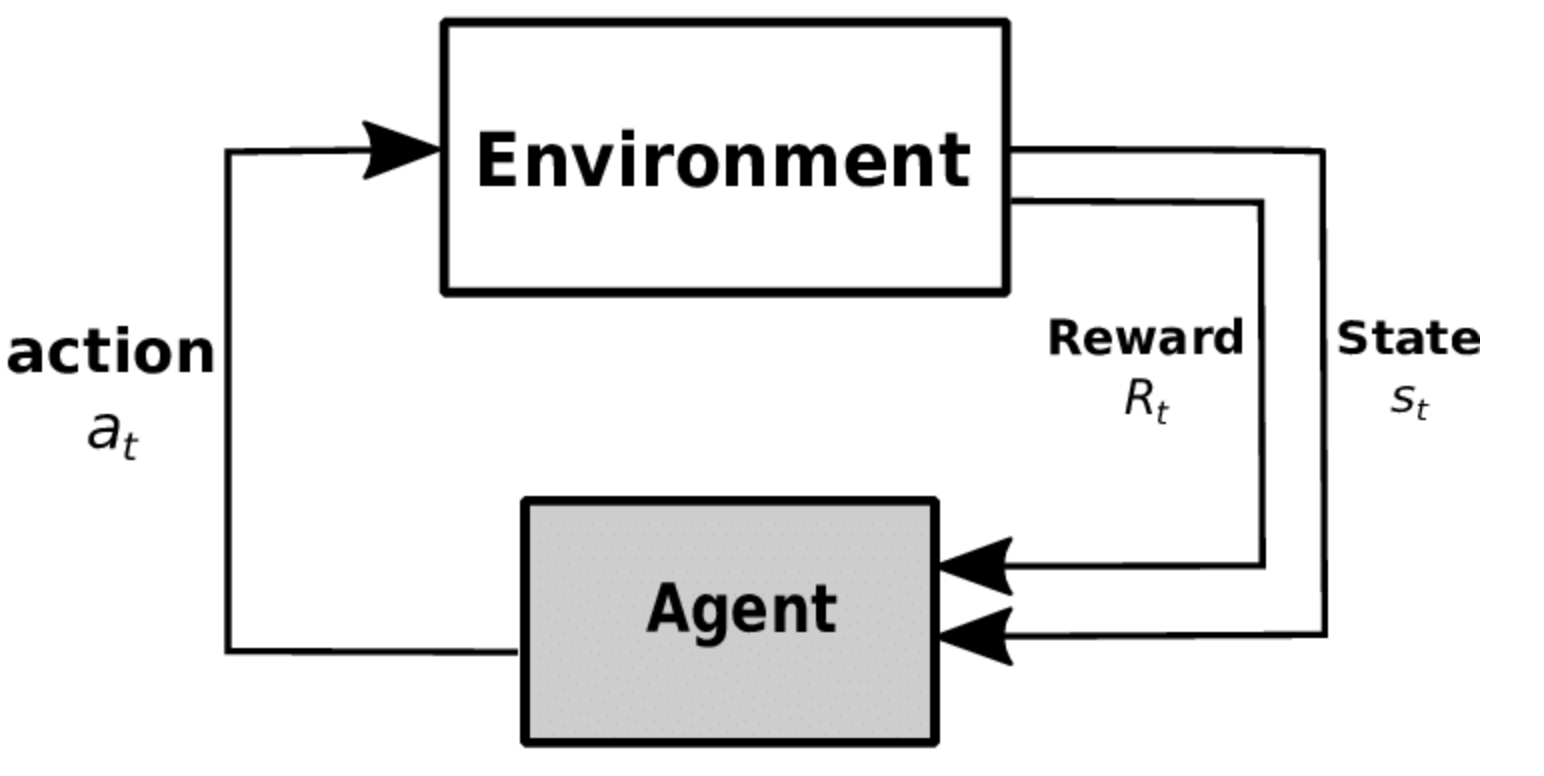
Our goal is for the drone to reach checkpoints without any collision and as fast as possible. We can now apply those terms to our use case:
The drone (Agent) can fly around (Actions) in and interact with the GTA map (Environment). After each movement, the drone arrives at a new position with new sensor data (state) and is rewarded, if the action did not result in any collision and minimized the distance to the next checkpoint (Reward Function).
3.1.2 Markov Property
To simplify, we skip a lot of theoretical background in this section and formulate the RL problem as intuitively as possible.
The set of all possible states is called state space. After each action, the agent goes from one state to another state from the state space, depending on the executed action. We assume that state sequences fulfill the markov property. This essentially means, that future system dynamics depend only on the current state. This makes the problem easier.
Translated to our use case: If we are in front of an object, it does not matter what happened in the past, we can get all the information we need from the current state to try to avoid this object.
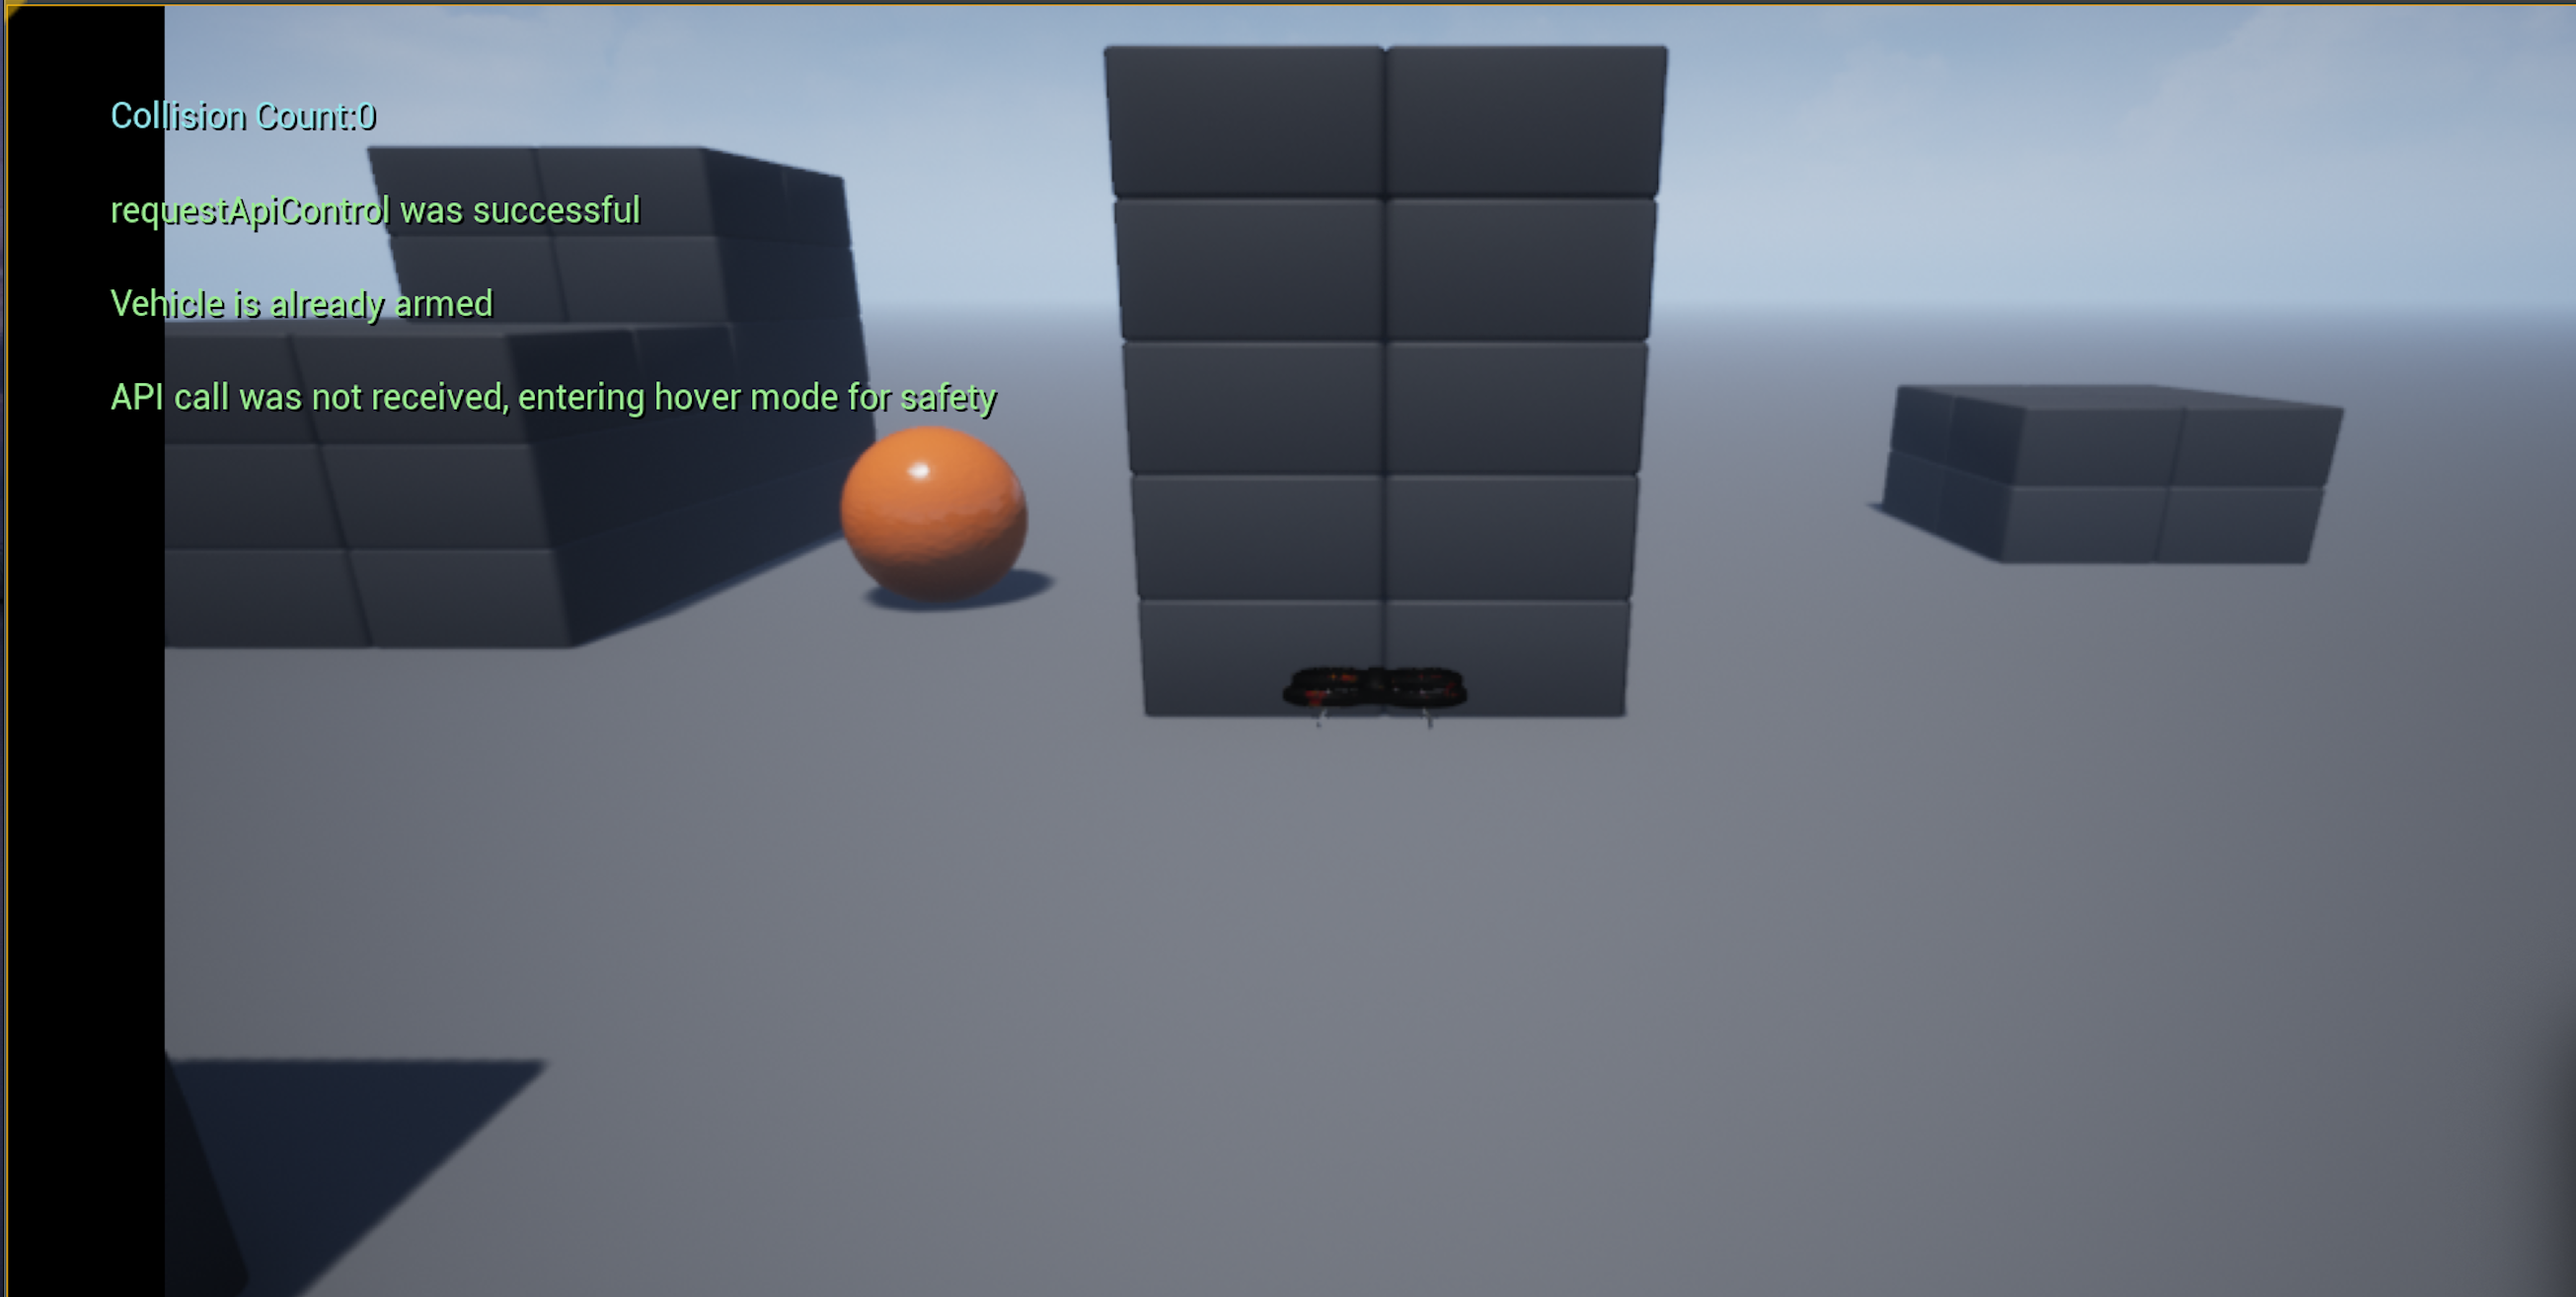
So now, we only need to solve the problem state by state: How to choose the best action depending on the current state!
3.1.3 Q-Learning: Value of Action
The hard problem however is, how to evaluate an action. For example, if we are in front of an object and the checkpoint is right behind the object, we may choose an action, that flies towards the object, which also does not lead to a collision (yet). So with that action, we got closer to the checkpoint and did not collide. Therefore the drone receives a positive reward.
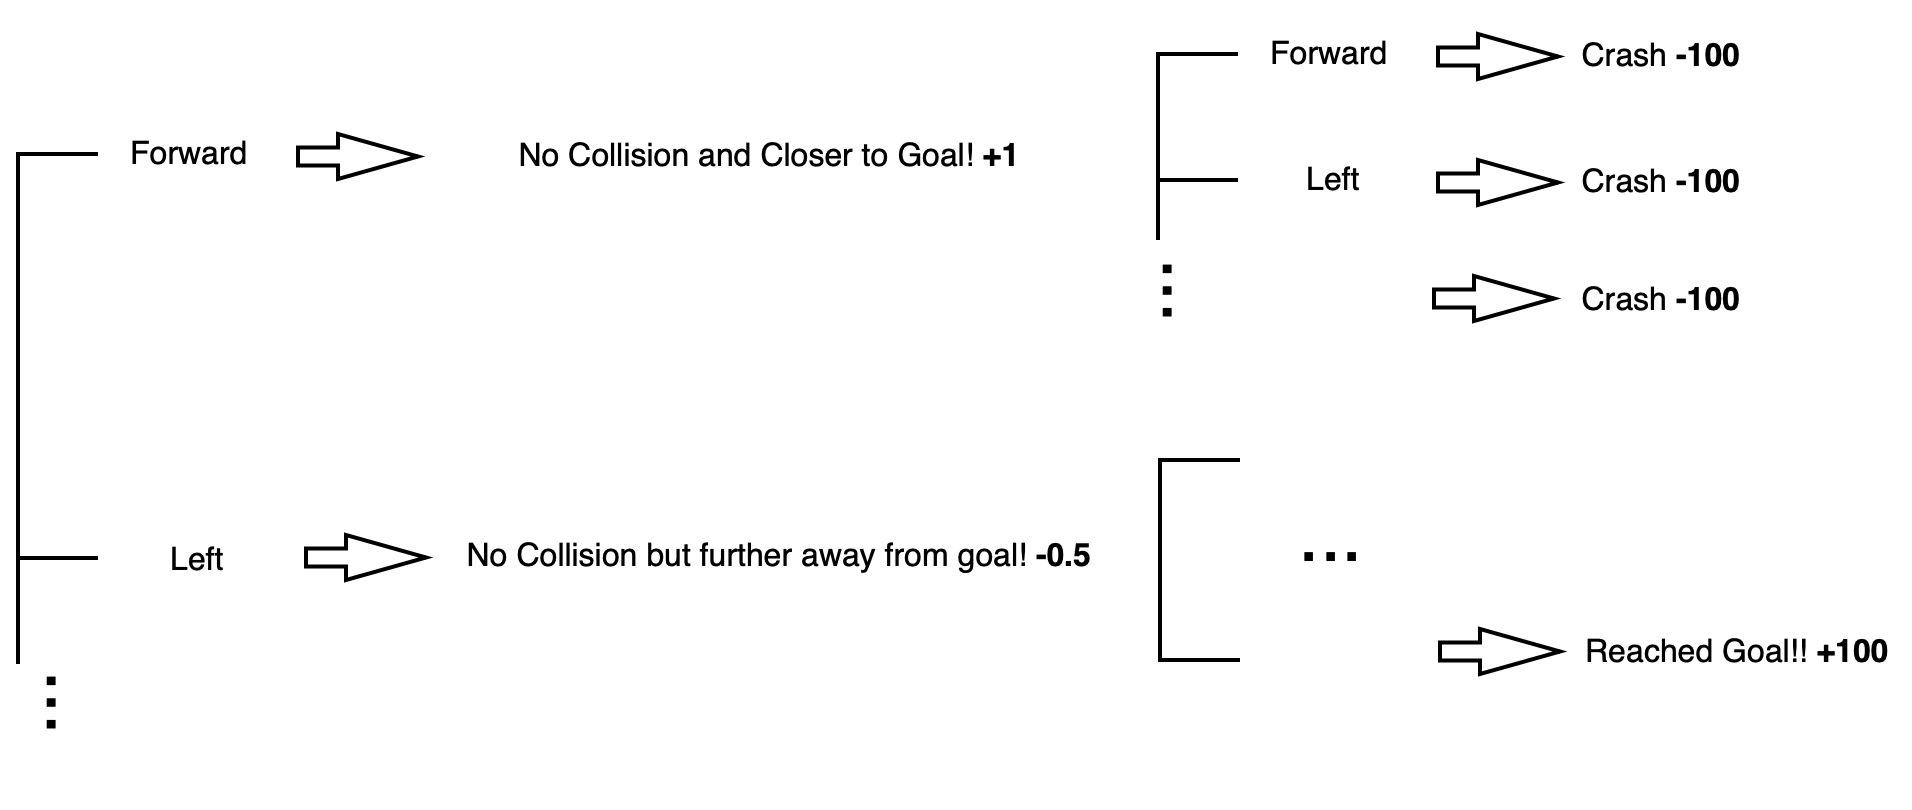
However, and this is the main issue in RL, in the next step (or near future), a collision might not be avoidable anymore! So, according to our reward, the action was good, but in reality, such a risky action must be avoided.
The value of action tries to resolve the previously described issue. We do not only consider the immidate reward, but also expected (future) rewards that will come after we execute an action. For the previous example this means, that we might not want to move forwards anymore, since this movement will lead to a collision in the future. We might want to go left, since we can then avoid the obstacle and reach the checkpoint, even if it means that we do not maximimze the immidiate reward. The value of action takes expected (future) rewards into consideration, and this is exactly what we want to maximize!
The Q-Learning algorithms tries to approximate the value of an action. This approximation can only be done by exploring a lot of different flight paths and then updating each chosen action with their respective value of action.

One problem remains: For each possible state and each possible action in that state we have to save the value of action. This is unfeasible as we have too many states (each position on the map is basically a state), we would easily run out of memory.
3.1.4 Deep Q-Learning: Solving the memory issue
The simple but brilliant idea is to replace this lookup table from the Q-Learning method with a neural network, that receives a state and predicts the corresponding value of action. With that trick, we do not save each state-action and the value of action in a table, but represent this information as the parameters of the network!

Another important advantage is, that the network can generalize to states that were not seen yet and predict the appropriate action. This can not be done with the Q-Learning since it only uses a state-action look-up table.
3.1.5 Experience Replay for improved Generalization
In order to improve the generalization of the drone pilots, one technique is the use of experience replay in Q-networks. With experience replay, we store the agent’s past experiences in a so-called replay memory during training. Therefore, the agent’s experience at time t is defined as a tuple:
e(t) = (agent state(t), action(t), reward(t+1), state(t+1)
These experiences can be stored in the replay memory according to some defined priority, e.g. experiences where the drone made a bad decision may be more important for further learning than those where it is already good at (so-called preferential replay memory). The experiences in the replay memory are then randomly sampled during the training of the neural network to break the correlation between consecutive samples. This is, because the sequential experiences of the agent in the environment are highly correlated, which would result in an inefficient learning proces.
Our drone pilots both use a preferential replay memory during training to improve the learning process.
3.2 Autopylot
Autopylot is built upon the base idea of Deep Q-Learning, introduced in section 3.1. Its base functionality was derived from a project called PEDRA. Even though the structure and functions were adapted heavily to fit the problem of navigating to checkpoints, some of the original code like the replay memory remains unchanged.
3.2.1 Training mode
The following pseudo-like code shows a strongly simplified version of the main training loop. It uses a specified flightpath-file from MDPG or ADPG and the config file as parameters.
def train(flightpaths, cfg):

    for flightpath in flightpaths:
      iters = 0
      iters_per_checkpoint = 0
      reset = first = flightpath.get_next()       #Get starting cp and
      teleport_to(reset)                          #teleport drone there
      target = flightpath.get_next()              #Get first target cp

      while iters < cfg.max_iters:
        iters += 1
        iters_per_checkpoint += 1
        action = select_and_take_action()         #Predict and take action using NN
        state = get_state()                       #Update state after action
        reward = reward(action)                   #Generate reward using reward function

        if has_collided() or moved_backwards:     #In case of collision of moving to far away from target

          if iters_per_checkpoint > 5000:         #Drone took more then 5000 actions on one checkpoint
            iters_per_checkpoint = 0              #Reset counter
            reset = target                        #Set last cp as reset cp
            target = flightpath.get_next()        #Get next target cp

            if target = first:                    #End of flightpath reached, get_next() returns first cp
              reset = target                      #Start from the beginning
              target = flightpath.get_next()      #Get next target cp

          teleport_to(reset)                      #Teleport drone to last cp

        if reached(target):                       #Drone reached target
          reset = target                          #Update reset cp
          target = flightpath.get_next()          #Get next target cp

          if target = first:                      #End of flightpath reached
            reset = target                        #Start from the beginning
            target = flightpath.get_next()        #Get next target cp
            teleport_to(reset)                    #Teleport drone to first cp

        if iters >= cfg.wait_before_train:        #Enough steps were taken to
          train(state, action, reward)            #Train the NN
3.2.2 Inference mode
Similiar to training mode but considerably shorter, a pseudo-like code was created, that shows a simplification of how inference mode works. Inputs are equal to training mode.
  def infer(flightpaths, cfg):

    for flightpath in flightpaths:
      first = flightpath.get_next()                                    #Get starting cp and
      teleport_to(first)                                               #teleport drone there
      target = flightpath.get_next()                                   #Get first target cp

      while target != first:                                           #While the flightpath was not completed

        while not reached(target):

          if directly_reachable(target) or distance(obstacle) > 150:   #If the way to target is free or obstacle is far away
            move_directly_to(target)                                   #Take one step directly towards target

          else:
            select_and_take_action()                                   #Predict and take action using NN

          if reached(target):                                          #Drone reached target
            target = flightpath.get_next()                             #Get next target cp
3.2.3 Q-Network and Target Network
We employ a Dueling Double Deep Q-learning (D3QN) architecture. This architecture is fundamentally grounded on the idea of Deep Q-learning (DQL), which is effective when the agent is operating in an environment with highly dimensional state space environment. Therefore, Deep Q Learning (DQL) employs a neural network that takes a state as an input and approximates the Q values for each action based on that state.
Furthermore, this architecture adds two concept on top of basic DQL:
- First, the Double DQL (D2QL) addresses the issue of overestimating of the Q-values. This is, because while learning we cannot be sure that the best action is the one with the highest Q-value. If non-optimal actions are regularly given a higher Q-value than the optimal best action, the learning will be complicated. To address this issue, we use two neural networks to decouple the action selection from the target Q-value generation. Therefore, Double DQL helps us to reduce the overestimation of Q-values and, as a consequence, helps us train faster and achieve more stable learning.
- Second, with Dueling D2QN (D3QN) we separate the estimation of the state value and the estimation of the advantage for each action. The advantages of separating the estimation is, that the Dueling DQN can learn which states are, or are not, valuable without having to learn the effect of each action at each state. The basic infrastructure of the learning algorithm is shown below.
The layers of these two networks share a similar structure with one core difference: Both layers take an input of length X followed by four fully-connected layers with the following number or neurons (2048, 1024, 1024, 512). Finally, the output layer of the advantages network has 49 output neurons (= number of actions) and the ouput layer of the value network has one output neuron (= value of current state).

Conclusively, this architecture helps us to accelerate the training. We can calculate the value of a state without estimating the Q-values for each action at that state. Further, it can help us to find much more reliable Q-values for each action by decoupling the estimation between two streams.
3.2.4 Action Space
At every possible state that neural net decides on one out of 49 possible actions. These actions allow the drone to move up, down, left, right, forward and many combinations of the former. A visualization and detailed explanation can be seen below.
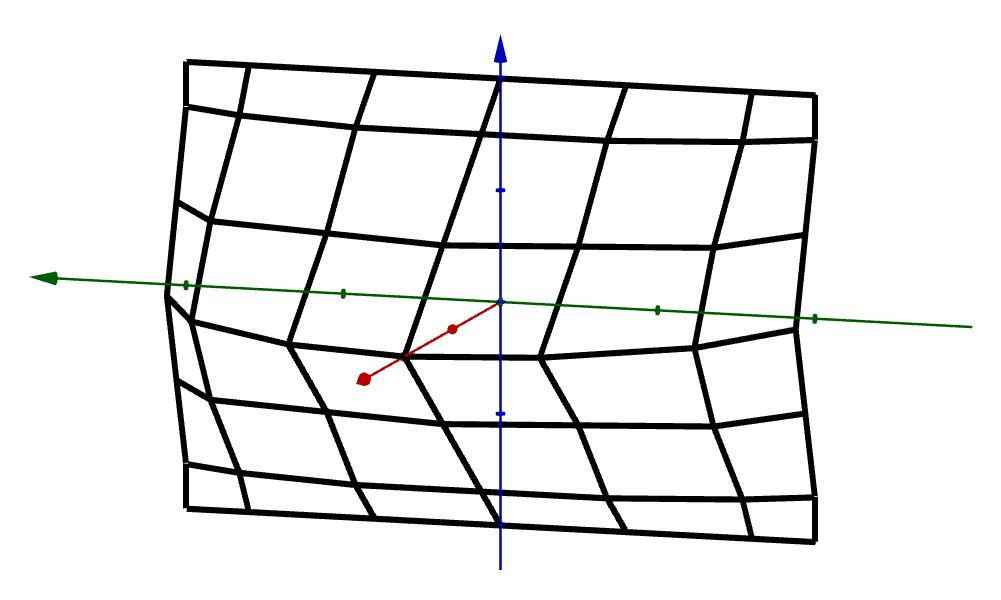
The origin of the coordinate system represents the current drone position. Because the drones rotation is taken into account for every action, the drone allways faces the positive x-axis (red) direction. The y-axis (green) points towards the drones’ right and the z-axis (blue) towards the drones downward direction (unreal uses negative z values for up). With that, the intersections of black lines indicate the directions of every possible action.
It is visible, that the chosen action space allows for very fine-grained movement options. Since the actions take rotations into account, the drone can nearly move freely in the environment. This can be advantageous in areas that require very precise movement.
The biggest drawback of this is, that training times become very long. Because of nearly unrestricted actions, optimization space becomes very large, in which there is allways room for improvement. Thus finding a stopping criterion for training is hard and the immense exploration potential has to be limited in reward generation.
3.2.5 State Space
Autopylots drone state consists of three parts: a lidar and an action similiarty component and the weighted target distance. The lidar component represents the environment around the drone in terms of obstacle distances. The action similarity encodes the information, which action leads to the checkpoint. The weighted target distance tells the agent how close it is to the checkpoint. Since Lidar and Action similarity are more complex, they are examined in more detail below,
Lidar state representation:
To solve the problem of varying point-cloud sizes from lidar sensors, Autopylot uses the horizontal and vertical angles of the returned point. The following pictures show how horizontal and vertical bins are set up.
| horizontal bins | vertical bins |
|---|---|
 | 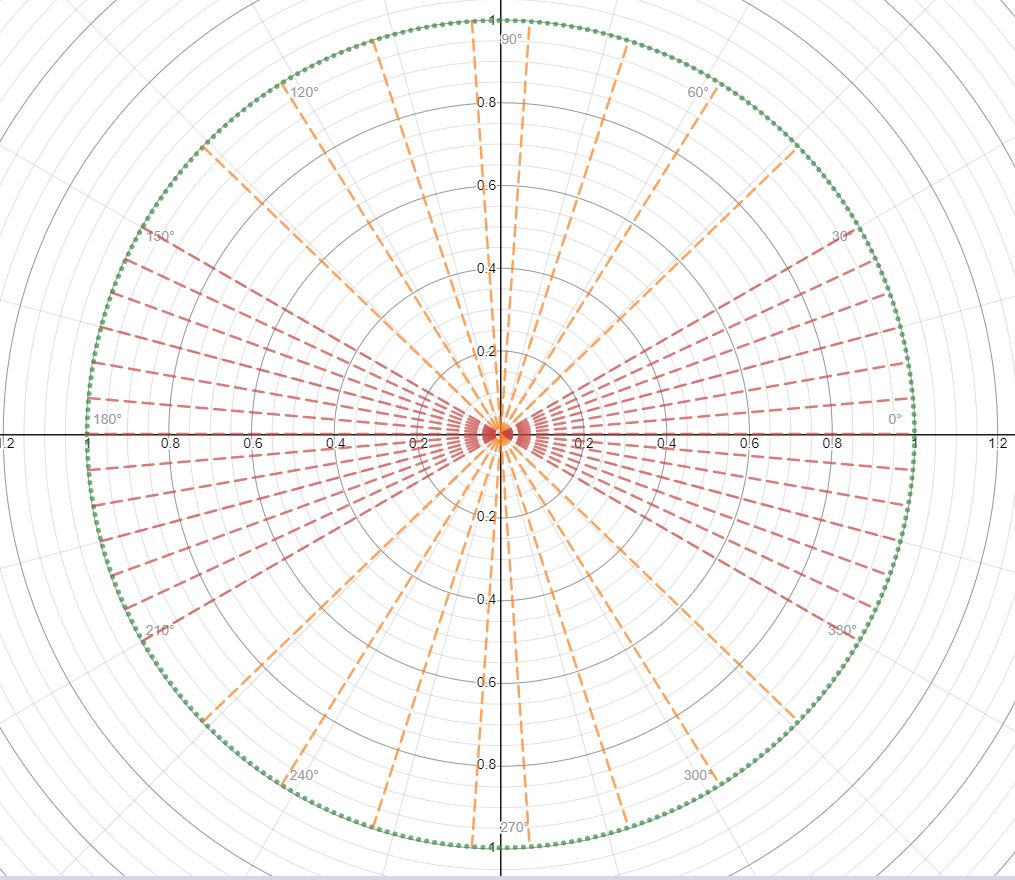 |
| Horizontal axis corresponds to forward direction, vertical axis corresponds to drones left/right. Dense bins (red) for everything left, in front and right of the drone. Sparse bins (orange) for everything behind the drone. | Horizontal axis corresponds to horizontal directions and vertical axis correspons to drones up/down. Dense bins(red) for the area on the drones horizontal level and sparse bins above and below the drone. |
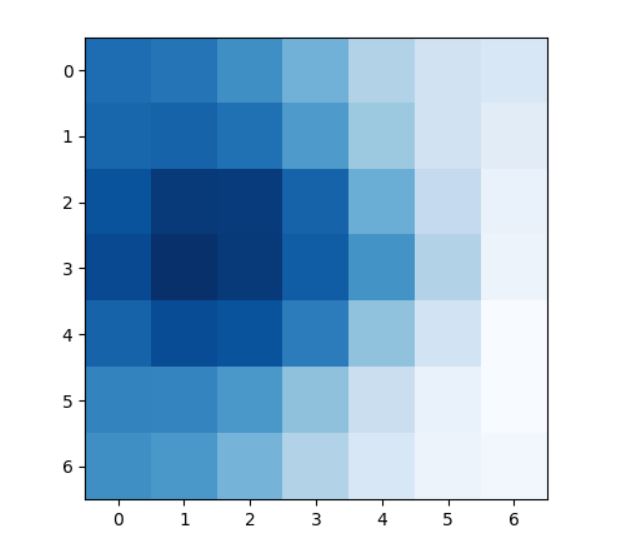
The bins serve as row and column ids for a 2D-matrix, where entries are minimum distances for very binned lidar point. The distances are normalized using the range of the sensor as the default maximum value. For obstacle free directions, no entries will be written in the matrix, leaving the default value for maximum distance. Thus, the densely sensed area in front of the drone is represented by the central entries of the matrix.
Action similarty:
For the second component, the cosine similarity of every possible action direction to the target direction is computed.
The example below shows the lidar and action target representation as heatmaps, where small values are shown in white and big values are shown in blue color. |Environment|Lidar|Action similarity| |–|–|–| | |
| |
| |
|
The two matrix shaped components are flattened and fed into the neural network.
3.2.6 Reward Function
The reward function allows us to punish undesirable actions and rewards steps that make progress. It looks like this:
| Condition | Reward |
|---|---|
| if checkpoint reached | 10 |
| if collided or Progress < -1 | -1 |
| else | epsilon*max(0,Progress)+alpha*(1.3-(1+Similarity)^0.5) |
Its uses two measures and two corresponding parameters to determine the reward. Epsilon scales reward if the agent made progress towards the target and alpha scales action punishment with an emphasis on backwards movement. A further description and a graph can be found below.
Progress:
The minimum target distance of each episode is tracked during training. Substracting the current target distance from the episode minimum distance yields the step progress distance. It tells us, how much progress the drone made towards the checkpoint and it can be negative, if it flew backwards.
Similarity:
Similarity is the cosine similarity of the taken action direction to the target direction. It indicates, wether the drone flew towards the checkpoint or not.
Since most steps will be evaluated by the third condition of the reward function, it is visualized below. Similarity and Progress behave very similarly, so we can plot both on one axis:
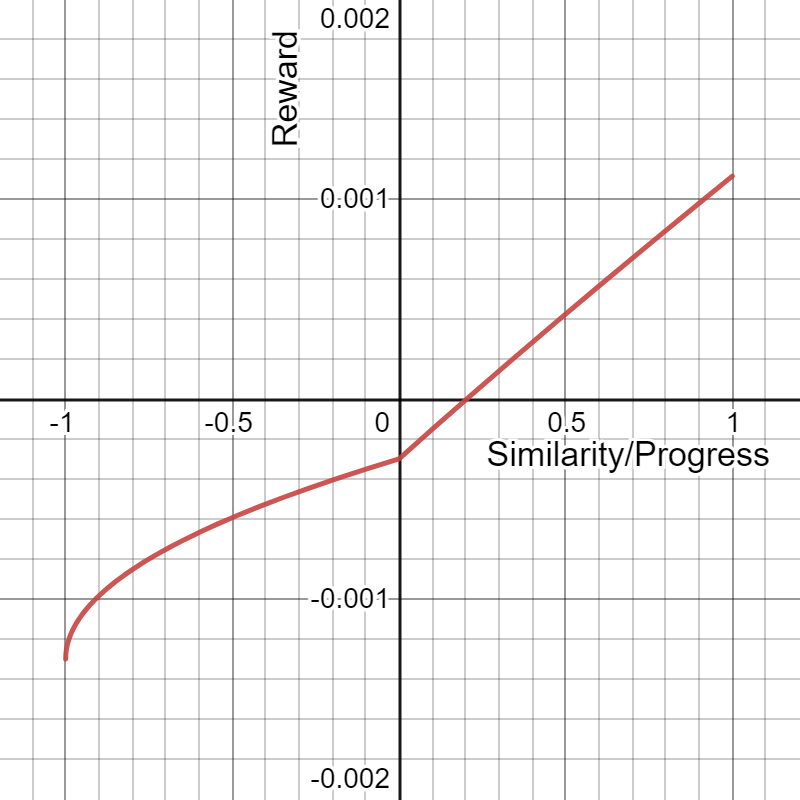
Even though both measures behave similarly, they both have legitimacy. Progress allows us to reward desirable behaviour scaled by epsilon (0.01) and to stop episodes, if the drone moves back too far. Similarity however is used for general step punishment scaled by alpha (-0.01) with stronger punishment on backwards steps, independent of Progress.
Click here to see how the function changes for different Epsilon/Alpha values.
3.3 Speedra
3.3.1 Training Mode
Speedra uses the same logic as Autopylot for training the drone, but one different is, that Speedra changes flight paths after each crash/checkpoint reached/limit reached. Furthermore Speedra was trained on starting point in front of an object and a not so far way endpoint behind the object. This helps the drone to help avoid obstacles faster than just training on generated flight paths. Obviously it is laborious to create such paths manually. We provide 30 flight paths for training the drone here [TODO].
  train(self):

    agent = PedraAgent()                          #Create drone in Airsim

    index_flight_path = 0
    flight_paths = get_flight_paths()            #Flightpaths that contain 2 checkpoints
                                                 #One in front of object and somewhere behind object
    agent.teleport_to()                          #teleport drone to starting point
    while True:
        state = self.get_state()                  #Get State
        action = self.policy()                    #Predict action using NN or Random action
        agents.take_action()                      #Let the drone execute the action

        self.post_action_update(agent_name)       #Update State, position, indicates if episode ends(crashed/limit iteration/checkpoint reached)

        self.reward_calculation_and_episode_restart_decision()      #Generate reward using reward function and reset if episode ends
                                                  #Decides if finish_ieration should change the flight path

        self.finish_iteration()                   #Append to Replay Memory,
                                                  #print logs
                                                  #Change Flight Path or Continue with the next iteration and teleport drone to start point

        if max_iter reached:                      #End Training when max iterations is reached
            break
3.3.2 Inference Mode
Speedra uses the same Hybrid solution as Autopylot and is identical to the approach of Autopylot. One difference is in the obstacle detection: Speedra uses the depth map whereas Autopylot uses Lidar sensors to detect objects.
The same Pseudocode applies to Speedra.
3.3.3 Action Space
Speedra uses a simplified action space. It only has 7 possible movements:
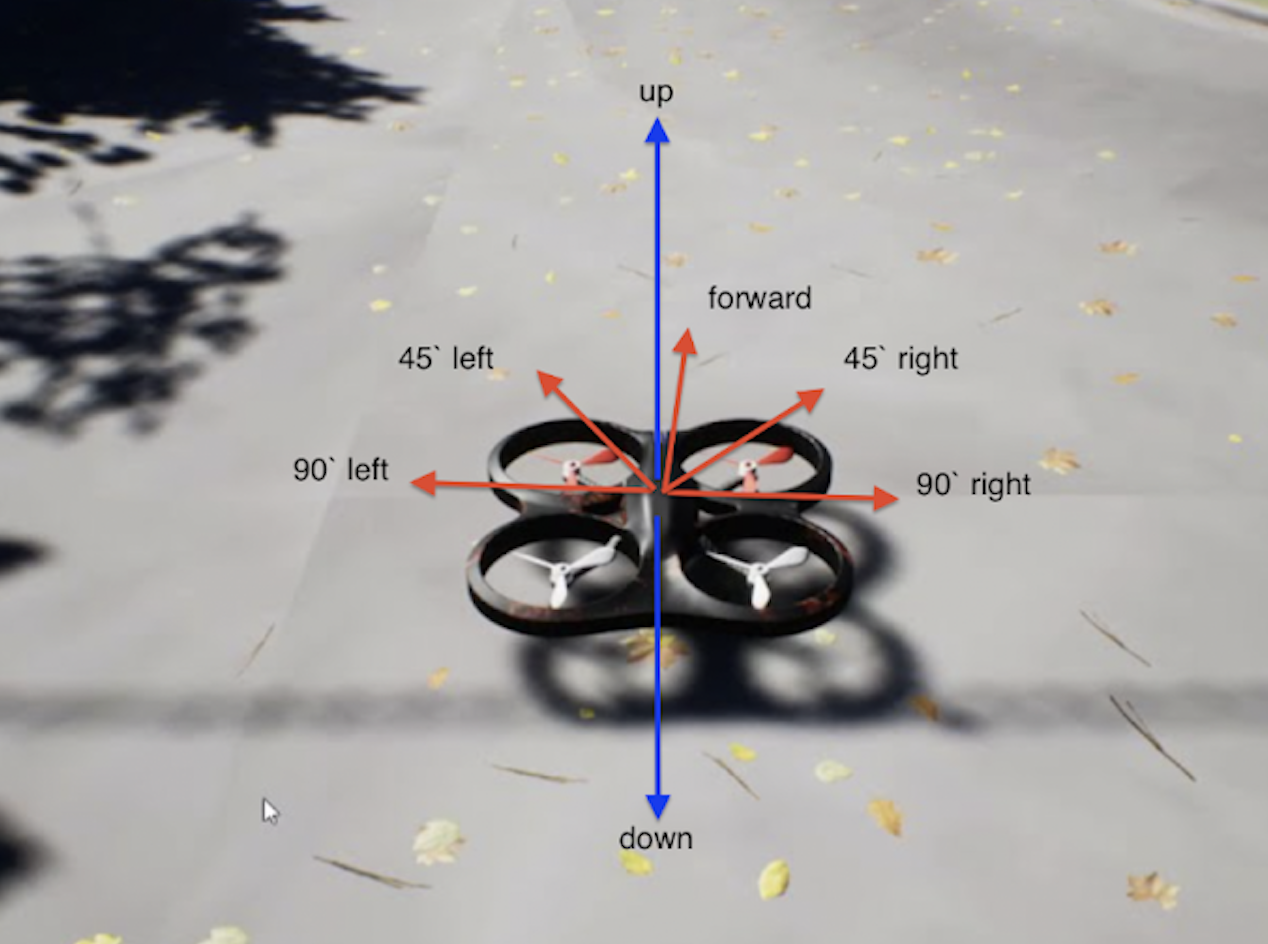
There is also no rotation movement, the drone always faces the same direction, which is why it is important that the drone starts each training path facing the next checkpoint. During inference, when we are in the rule-based flying, we also always face the next checkpoint, till it enters the AI mode. This makes sure that the training and inference conditions are the same.
For training we use static movements, e.g. teleporting the drone. This allows for even faster training time. For inference, we use “dynamic” movements, e.g. controlling the drone via velocity.
The simplified movement do have restrictions: It is quite rigit, which makes flexible movements hard to execute. This could be a problem in tight spaces where such movements is needed. Another quite obvious drawback is that the drone can not move backwards.
But simple action space had a major advantage: It allows us to train the model fast and see results after a short time. This makes experimenting with different settings much easier and with the time-contraints that we had, the choice of a simple action space was made.
3.2.4 State Space
As Autopylot, we are using Lidar Sensors to constantely evaluate our environment. As we already mentioned LIDAR gives an unstructured Point Cloud that can vary in size. Speedra and Autopylot differ in their transformation to a structured, consistent input for the network. Speedra also uses the binning of angles strategy (see Autpylot’s State Space Section for more details) and transform it into a 2D Matrix. This gives us a 360° view of our environment.
An Illustration of the 2D Matrix can be seen here:

Furthermore, Speedra use the current position, the x, y and z difference from our current position to the next checkpoint and the euclidean distance to the next checkpoint for positional information.
3.3.5 Reward Function
Speedra’s Reward logic goes as follow:

where dx, dy and dz are the differences between the current (x-, y- or z-) distance to checkpoint and previous (x-, y- or z-) distance to checkpoint. It basically tests if we got closer to the checkpoint in at least one of the 3 directions.
We tested many, many other reward functions but heuristically, this reward function worked best for Speedra’s approach (tested on small racetracks).
3.3.6 Q-Network
Since our state is a 2D Matrix, we are using a Convolutional Neural Network. We feed the transformed LIDAR Sensor into the input layer, and additionally concatenate the positional informations after the convolutions, which is then fed into fully connected feedforward network.
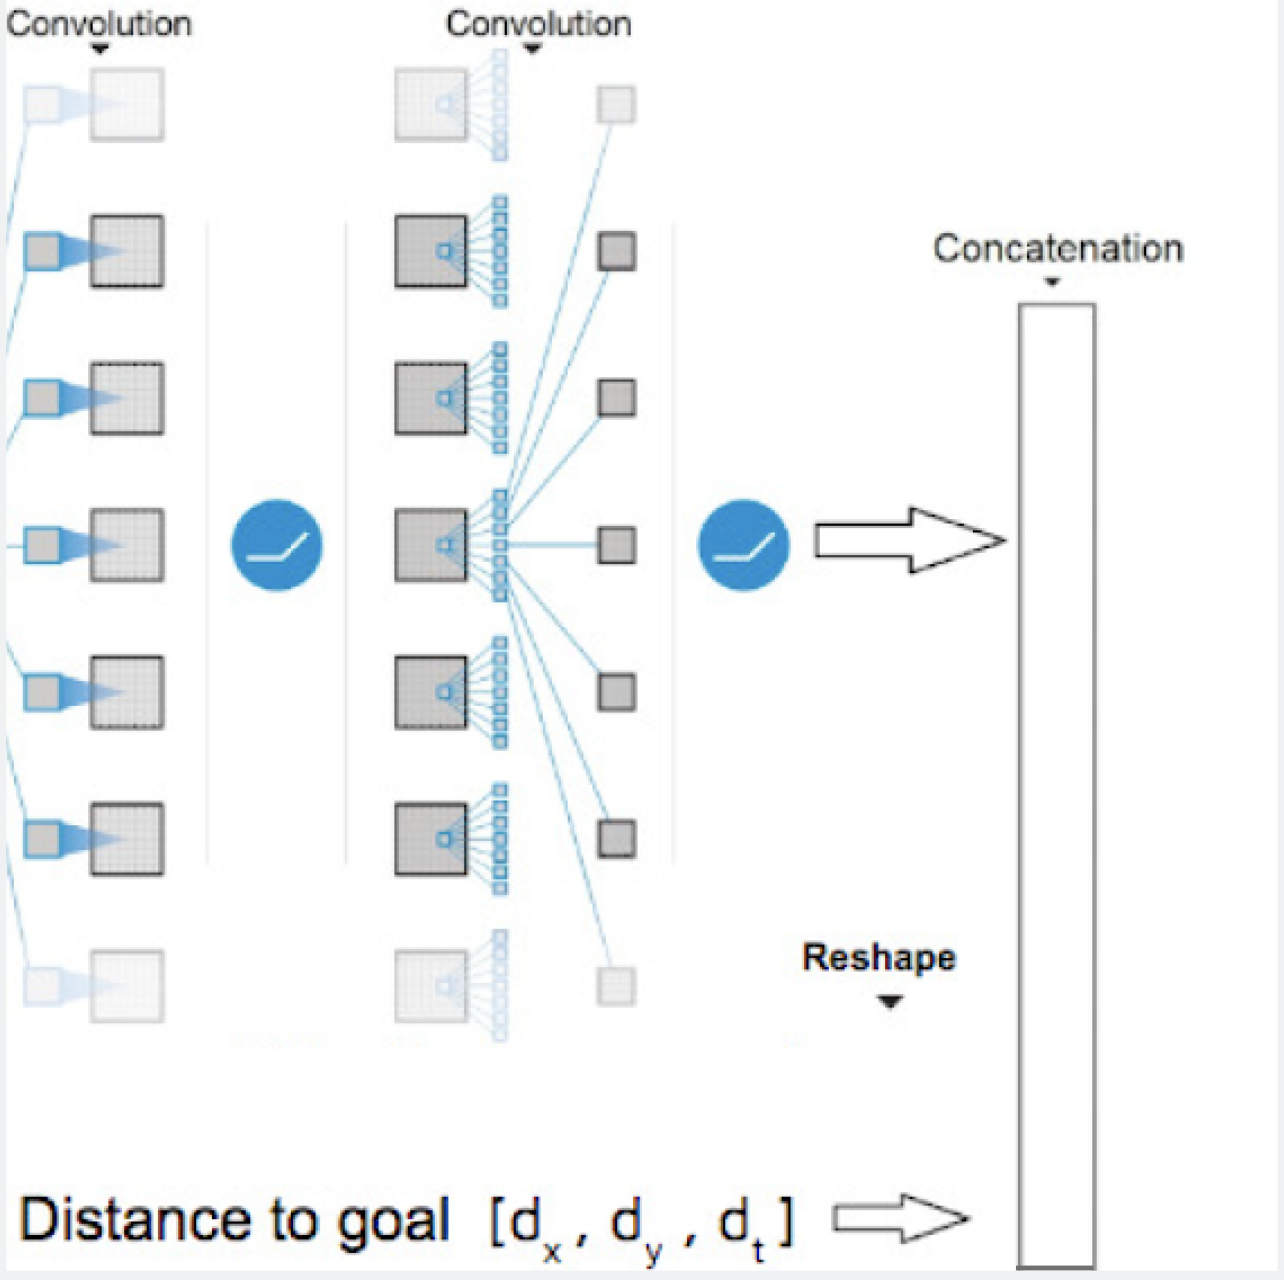 | 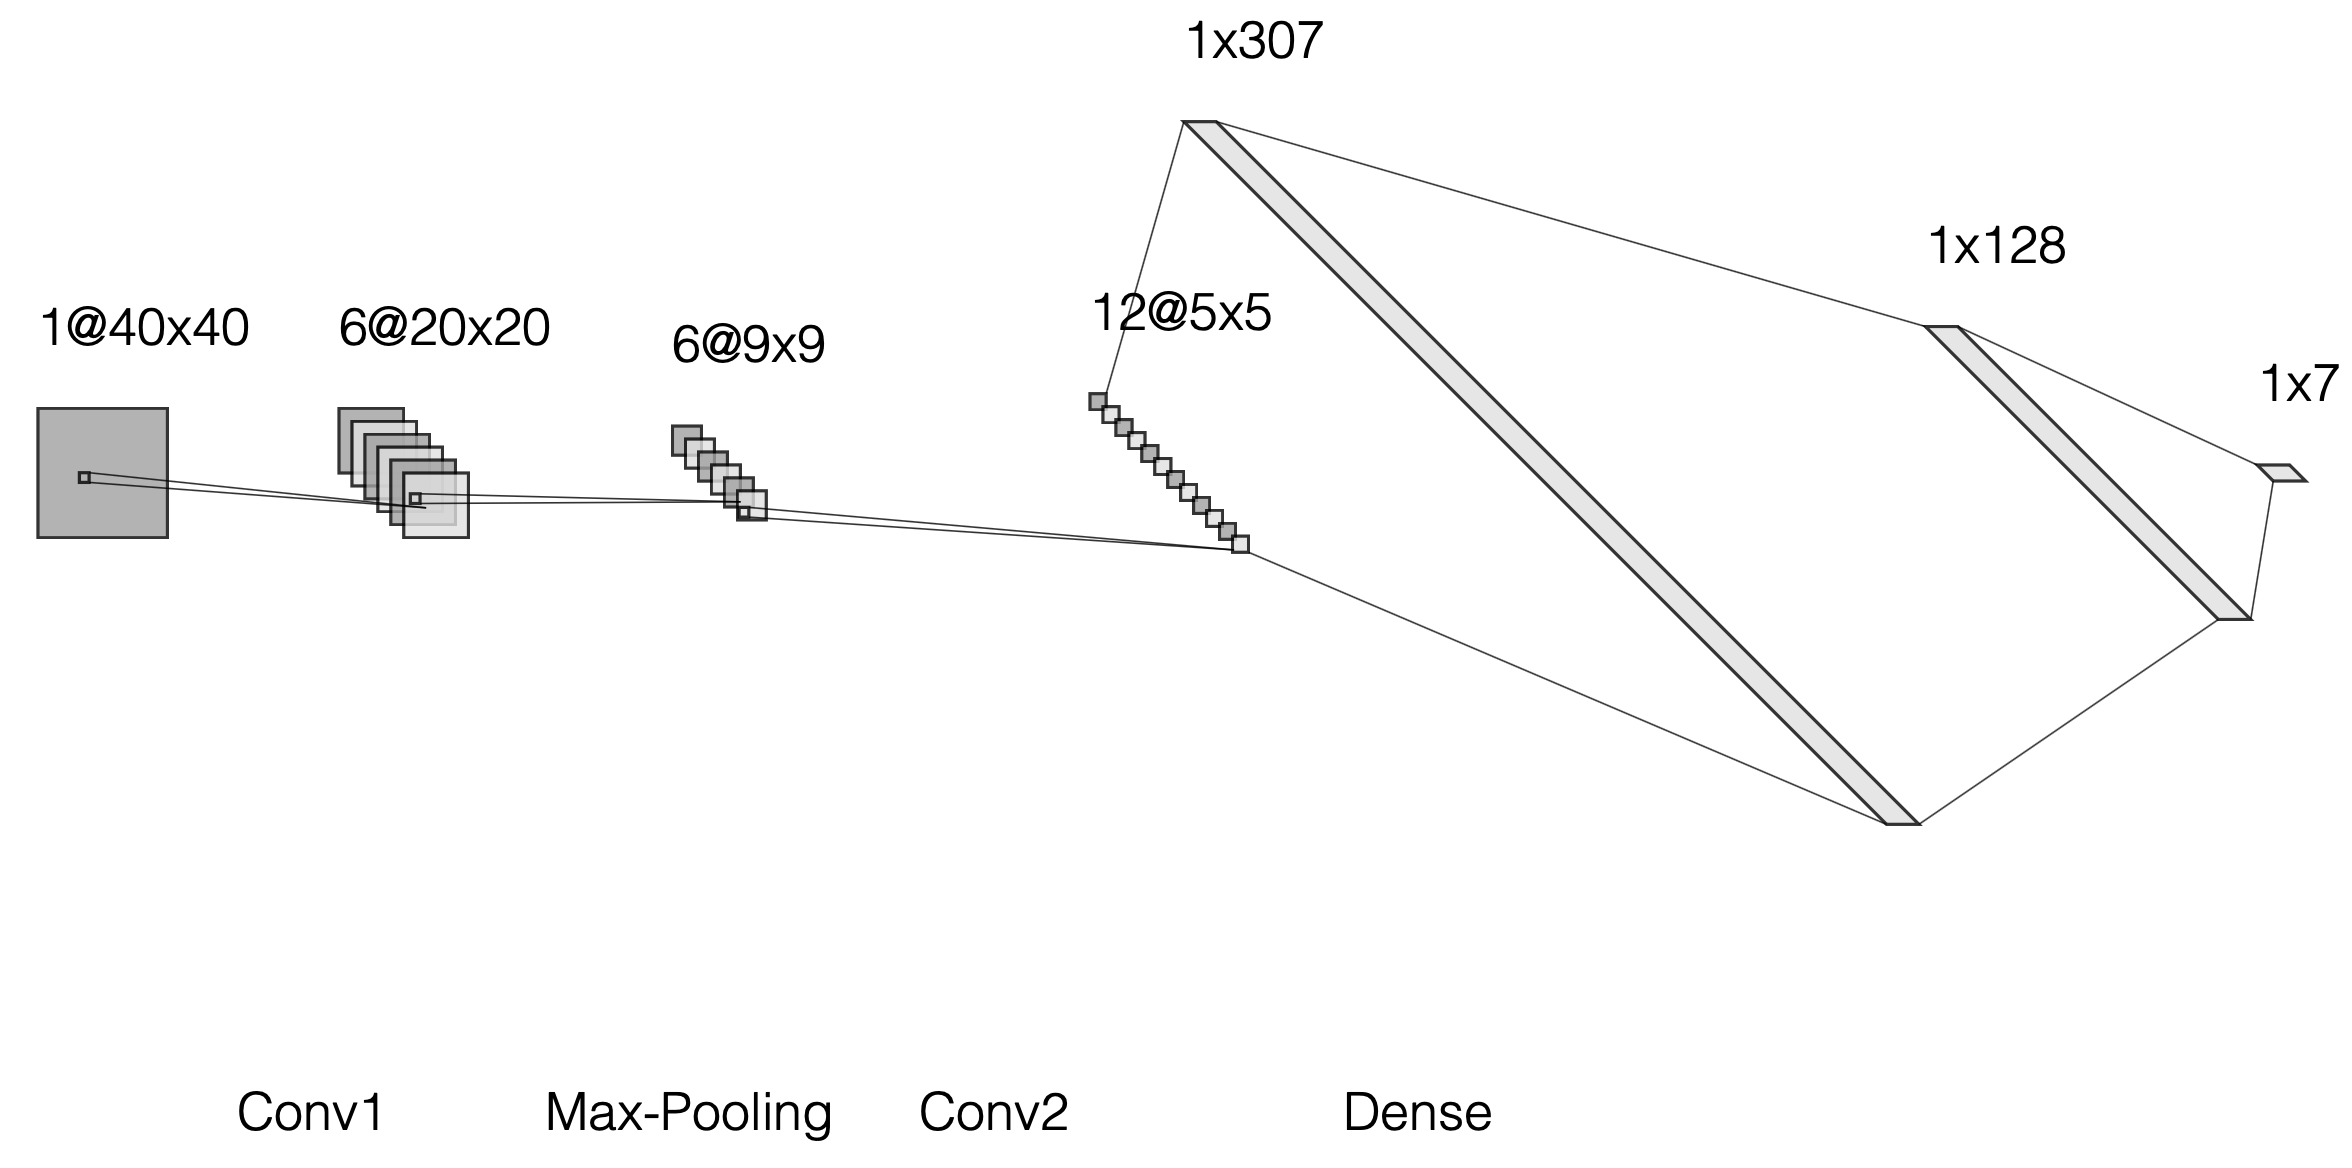 |
On the left image, you can see the idea behind concatenating positional information after doing convolutions. On the right image you can see our full network.
3.4 Short Comparison between Autopylot and Speedra
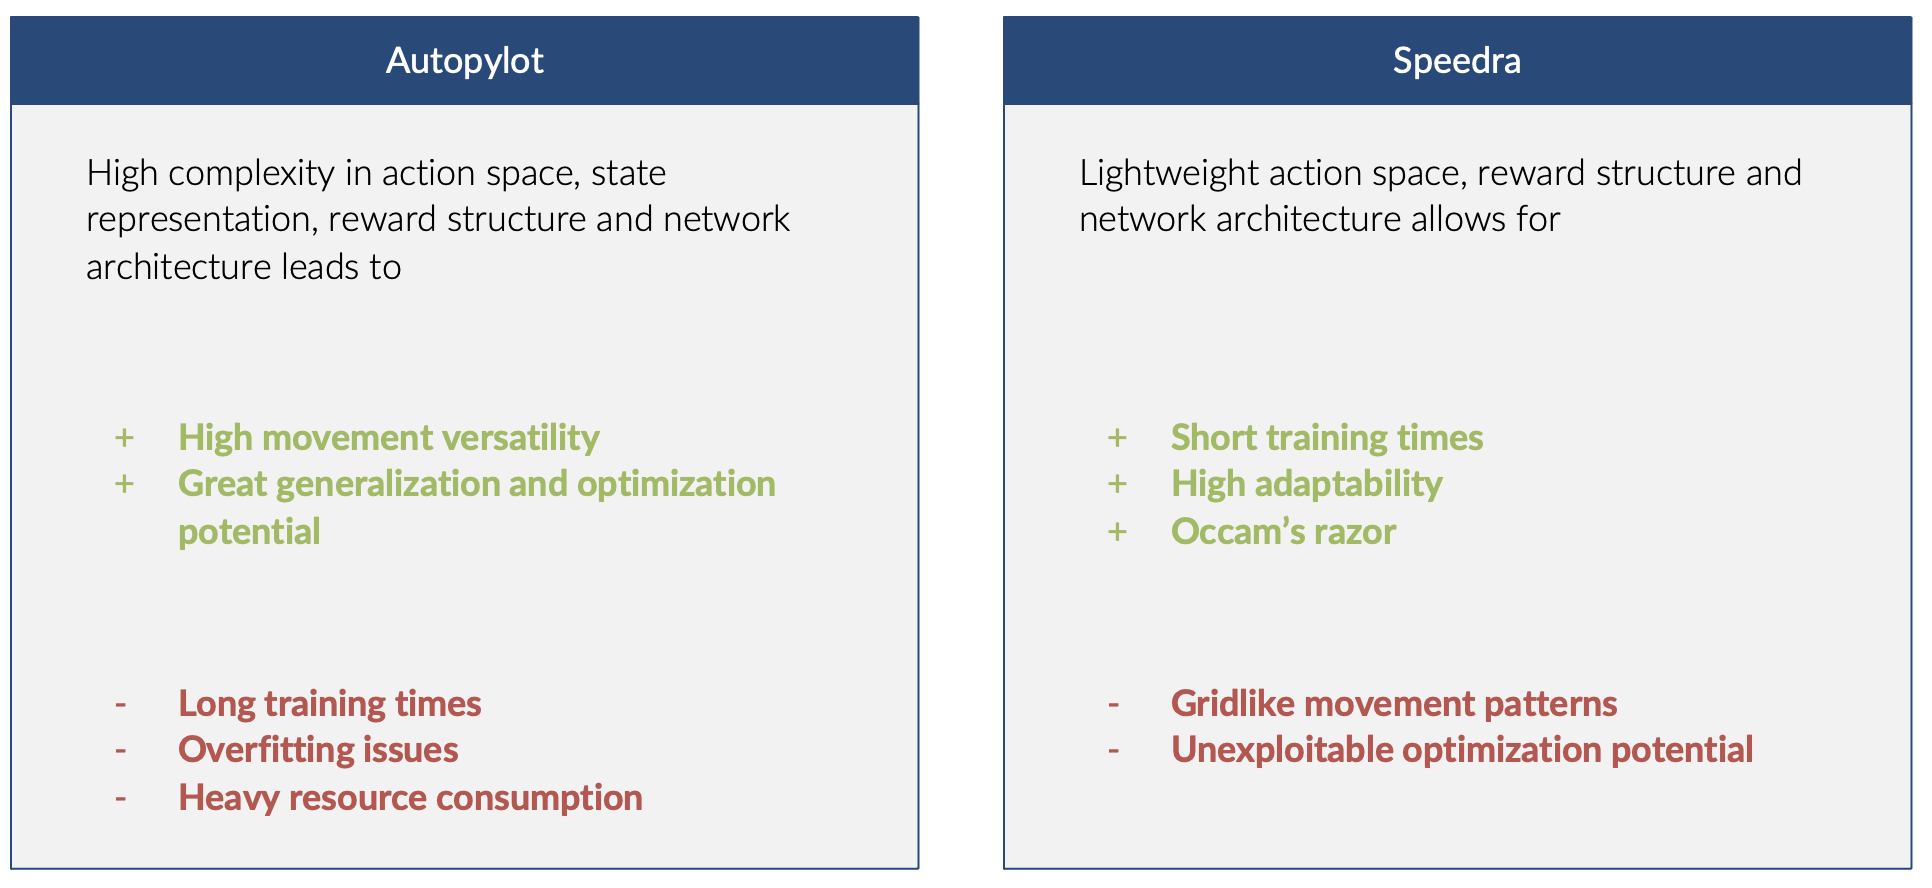
Here, we will shortly discuss in which aspects Autoyplot and Speedra differ. For more information of each chosen method, please go to the respective section of each pilots. The pilots differ in:
- State space: Using different sensor data to form an informative description of the environment. Autopylot and Speedra do however use the same sensor (coupled with positional information), Lidar Sensor, but then transform them into different formats, which in turn result in different states.
- Action Space: Restricting drones in their movement is important. Too many possible movement options leads to increased training time; Too little movement options and the drone becomes less flexible. Autopylot chose a more flexible drone, whereas Speedra has a much more simplified action space.
- Reward Function: With reward functions, one has to balance between giving enough punishment for a collision and also give enough reward to motivate the drone to try to fly around an object (which is risky) and reaching the checkpoint.
- Architecture of Q-Network: Since the State Space is different, Autopylot is using a feedforward neural network and Speedra a Convolutional Neural Network.
4. Discussion
We created an easy to use (simulated) sensor data generation system. Creating many diverse paths, that have create flexibilty, e.g. starting in one biome and ending in another one, can be done by one click of the Plugin ADPG. To create specifc paths, the user can just drop and drag checkpoints in the Unreal Engine Editor and save it via the ManualPathGenerator Plugin. Additionally, this product comes with two pre-trained reeinforcement learning piloting systems that can fly paths around the GTA map. Furthermore both drones come with very different advantages, that the user can exploit, depending on his use-case.
However, like in every software product, there are weaknesses that can still be improved on. In this section, we want to have an honest discussion about our product, and identify parts, that can be worked on.
4.1 Automatic Drone Path Generation
The ADPG Plugin is very easy to use and allows the user to create flexible and realistic flight paths. The VisualizePath Plugin complements ADPG perfectly to check for created flight paths.
Randomness of NavMeshes
Even though, we introduced a lot of parameters for the user to create his desired flight paths, there still exists some, for now, uncontrollable randomness. This randomness comes from the the NavMesh and how it tries to find walkable and reachable surface.
3.3 Piloting Systems
We provided two pre-trained reeinforcement learning piloting systems to navigate the flightpaths. Those achieve great results depending on the selected flight paths. We already discussed the main differences between Autopylot and Speedra, in this section we want to identify future works in both pilots. Before diving into the specifc pilots, we give possible improvements that can be applied to both systems.
Creating diverse training paths
Spending time to create very diverse training paths on the desired environment (here: GTA Map) could allow the drones to improve flying paths in different situations in the environment, e.g. flying in coastal areas, avoiding rocks and flying through the city. Both situations should be reprentative in the training set.
Covering different situations, e.g. flight paths in different biomes, is currently not done. We have, however, created 30 different obstacle avoidance flight paths for the city biome, which Speedra trained on. Speedra showed great results in city areas, but could not absolve some flight paths that were in the mountain biome (problem with flying down a mountain). Autopylot on the other hand was trained with paths, that were closed to the ground and consequently struggled with flying flight paths that were high above the ground.
This shows the potential improvements of creating such diverse training paths.
3.3.1 Autopylot
Autopylot showed very promising results by flying through a very dense city area. However, there are still some possible improvements, that still has to be explored.
Changing LiDAR structure and using CNN
Autopylot is currently using a vector representation of LiDAR sensors. This could be replaced by using a matrix representation and therefore keeping some of the positional information of those sensors. We then replace the current network with a CNN to exploit the new state representation.
With using a vector representation, one loses the two dimensional positional information, which could be used by the network. This can be avoided by using a matrix representation.
Using a CNN will probably also improve generalization, as CNN’s are known for to be shift invariant. In the drones case this could be very useful, since the drone will rotate a lot as it moves around - in the case for a feedforward neural network, this would be quite hard to learn, since the vector representation would also shift around.
This method also proved to be efficient for Speedra.
Training Time
As already mentioned, Autopylot need a lot of training time to work properly. This can be a challenge, when the user need to further train the model to adapt to new situations or want to do some experiments, for example, try a new reward function out.
Reduce Action Space Complexity
Autopylot was created to fly around very narrow passages and try to avoid complex-shaped obstacles. That is the reason, why Autopylot has such a complex and rich structure action space, having 49 possible actions. However, for the “new purpose” of flying around big maps and collecting data, this complexity might not be neccessary anymore.
3.3.2 Speedra
Speedra has the ability to quickly learn flight paths and adapt to new environments with small training time. This however comes also with a few drawbacks.
Fluent Actions
Speedra trains with static movements to speed up training times, but this come with an disadvantage: We have to mimic this static movement during inference to represent the actions that were executed during training. That is why Speedra does not have fly fluently during inference.
One way to keep atleast some of the fast training times of Speedra, is to pretrain Speedra on static movements first, and after some time, take the trained model and train it with dynamic movements. This could allow Speedra to still learn fast and then adapt to fluent movements.
Increase Action Space Complexity
As the action space is quite simple, this restricts the flight paths that Speedra can fly. Flight paths, were the drone has to fly some steps backwards are for example impossible. This could be looked into.
Unexploitable optimization potential
Speedra is naturally upper bounded, as it incorporates a simple action space with a quite small network, meaning that even with a great amount of training time, some flight paths can never be absolved.
Open questions are: How many different environments/biomes can Speedra learn? How precise can Speedra fly narrow passages? Where the upper bound lies is still to be explored.